Showing posts with label DIY project. Show all posts

February 18, 2014

DIY Parisian Inspired Journal with Americana Home Chalky Finish Paint #diy #craft

I have had a large 8.5"x11" Daler Rowney hardback sketch book in my studio for a while now...going on two years actually, and I haven't really know what to do with it until recently.

I wanted it to be something special, and I knew that the new Americana Home Chalky Finish paint and stencils would make for a really lovely design on my cover of my journal.

Materials

Sketchbook {I picked up mine at Walmart for about $12}
Americana Home Chalky Finish paint {I used Everlasting for the base and Relic for the stencil}
Americana Home Chalky Finish Stencils
Americana Traditions flat brush
Americana Accessories stencil sponge


The first step in this project is to remove the front cover from the rest of your sketchbook. Since I used a spiral bound book, it was easy to pop it off and get started painting.

With my flat brush, I applied one layer of Americana Home Chalky Finish Paint in Everlasting. When most of the cover was dry, I used the excess paint from the metal part of the paint brush handle to apply more of the paint for a distressed look.


Once dry, position your stencil {I chose Vintage Keys}. Using a stencil sponge, dip it in your accent color, then in your base color. Remove the excess paint, then apply over your stencil, working it evenly onto the surface of your sketchbook. You are essentially creating highlights and contrast, so be sure to mix it up and work with your paints until you are happy with how the stencil turns out.


Allow the paint to dry completely. You can further distress the cover of your sketchbook by rubbing the stenciled image and edges lightly with sandpaper. You can also embellish your journal with ribbons, sculpted elements, or like I have done here with a vintage skeleton key to further bring out the Parisian theme.


This project would make an excellent gift for a mom-to-be to journal her pregnancy and newborn adventures, and would also be stunning as a guest book at a wedding.

Disclaimer: I am a part of the Decoart Core Blogger program and was sent product to use for this tutorial and was compensated for this point. All views and opinion expressed are my own.
Photobucket

January 21, 2014

DIY Upcycled DecoArt Chalkboard Coffee Table


We have had this table from IKEA for a few years and it has taken a beating. It's been used as a coffee table, ottoman, race track, eating area for Owen, painting area for me and has marks, dents and scratches all over it.

It can still be a functional piece of furniture, but giving it a facelift with some Chalkboard Paint made the surface look new again.


Materials

Wooden coffee table
Clear or black Americana Chalkboard Paint

First, clean off your table from any debris, food and smudges. Make sure you clean it really well and dry it off as well. If your table top is smooth, rough it up a bit with some sandpaper so that the paint will adhere properly.

Once your surface is dry, paint a layer of Chalkboard Paint in one direction. You can choose to do this either vertically or horizontally. Allow to dry for 1 hour and then apply your second coat in the opposite direction {ie: if you painted vertically the first coat, go horizontally now, and vice versa}.


Allow to dry for 24 hours. Yes. Twenty. Four.

Now, if you quite like the color of your table, you might want to use the Clear Chalkboard Paint Coating here. This will allow the natural beauty of your table to shine through, protecting the surface, and turn it into an art centre for little ones!

Since our table had a dark espresso finish and the top was marred with various blemishes, I went with the black Chalkboard Paint.

Once the paint has cured over the 24hrs, you're ready to rub it with chalk. This is known as seasoning. Rub the surface lightly with chalk, then wipe clean. This will ensure that no phantom images get left behind on your table.

Then go crazy! Draw pictures, play tic-tac-toe...use it as a game board for when friends come over! It even makes a great homework station for the kiddos!
 

Disclaimer: I am a part of the DecoArt Core Blogger Program and was compensated for this post and project. All opinions expressed are my own.

Photobucket

September 2, 2013

5th Anniversary Wooden Gifts using Americana Multi Surface Satin and Stencils

When I was on the search for the perfect 5th wedding anniversary gift for my husband, it dawned on me that it was the perfect time to get crafty with my bad self.

I have seen these beautiful, yes masculine, jewelry boxes at local home decor stores and thought to myself I can totally make that. So...here goes!

Materials

Wooden box in the shape and size of your choice {I went with a standard round box}
Paint brushes
Americana Multi Surface Satin in the colors of your choice {I chose Dolphin and Mushroom}
Cup for water
Sponge wedge
Paper towel
Americana geometric stencils {oh hey...I designed the geometric one that is NEW for 2013!}
Fine sandpaper {optional}


First, wipe down your wooden box to clear any dust from being up on the shelf at the store. Next, water down a bit of your lighter Americana Multi Surface Satin color. Paint it on the wooden box, rubbing off the excess paint with paper towel.

Essentially, you are using the paint as a custom wood stain. Cool, right? The more you rub with a paper towel, the more of a distressed look you will have in the end.

Where can you find these awesome new paints from DecoArt? Americana Multi-Surface Satins are available for purchase at Michaels, A.C. Moore, Hobby Lobby, and other fine craft retailers.

Once you have allowed the box to dry entirely, you are ready to get stenciling. Carefully place your stencil over the area on your box that you want to embellish, and with your sponge wedge, paint your second color {the darker tone} over the stencil. Use a dabbing motion and add the paint on very lightly. You may want to remove some of the excess paint

Peel away the stencil, and clean it off while you wait for the paint to dry a bit. Once the paint is completely dry, you can go in with your fine sandpaper and distress to your hearts content. You can choose to do only the edges, or go over the entire surface. Alternatively, if you'd prefer not to use sandpaper, you can wait until your paint is almost dry and distress with a dry paint brush, wire brush, or steel wool.

I absolutely love the worn look of this box and think that my husband will love it as well!


Now you can SAVE on the Americana Multi Surface Satin (US Residents only)


Disclaimer: I am a part of DecoArt Core Blogger Program and was financially compensated for this post. The concept, views and opinions expressed are my own.

Photobucket

February 13, 2013

Valentine's Projects and DecoArt Giveaway

Well, Valentine's Day is tomorrow. Do you have everything checked off your list?

Beautiful centrepiece for that romantic dinner with your spouse, embellished with a little Glamour Dust?
Cute throw pillows to pump up your holiday decor, painted with SoSoft?
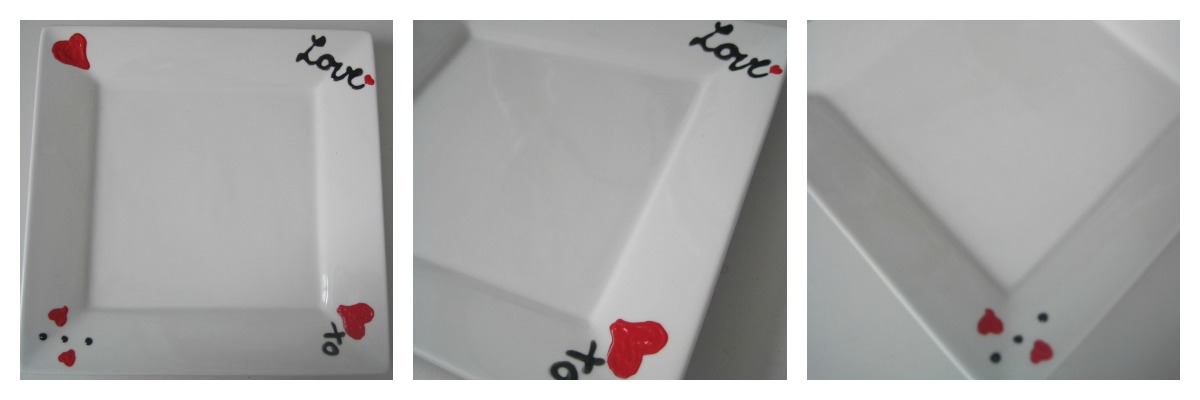
Whimsical dessert plate painted with DecoArt 3D Opaque Gloss Enamels?

Have no fear, all of these projects take just minutes and you can complete right in time to set the stage for a romantic dinner with your favourite person.

Dessert Plate
Level: Beginner
Materials: Ovensafe plate, DecoArt 3D Opaque Gloss Enamels

This project is so incredibly easy! Simply write the lyrics to a love song, a poem, or just a little sweet note on your dessert plate with the Gloss Enamels. Allow to dry for 4 days, then pop in your oven at 325F for 30minutes. Cool, and place your favourite dessert!


Heart Pillow
Level: Beginner
Materials: Cotton throw pillow, DecoArt So Soft fabric paint, paint brush

Another easy peasy project! With your paint brush, draw hearts with the So Soft fabric paint. Allow to dry and voila! Instant Valentine decor! For a more advanced variation, try wetting the surface a little and watering down the paint for a watercolour effect!


Glamour Centrepiece
Level: Beginner
Materials: Plank of wood, votive candles, Glamour Dust Ultra Fine Glitter Paint


First, put down some newspaper to protect your table, then paint your plank of wood {I used a $1 piece from Michaels} with your Glamour Dust Ultra Fine Glitter Paint. I brushed it on, then used a crumpled paper towel to blend the colours and swirl them together. Allow to dry, then cluster your votive candles and light to set the stage for a romantic dinner!

And now....it's time for a DecoArt giveaway!


a Rafflecopter giveaway

*Disclaimer: this post was sponsored by DecoArt. All projects completed and views expressed are my own, however I was provided product to complete them.

Photobucket

November 16, 2012

Fabulous Finds Friday: Advent Calendar Alternative

One thing that I loved as a child was the Advent Calendar. Waiting in anticipation for the next morning, opening the little door to reveal a sweet chocolate surprise.

One thing I love even more is getting creative with my son's advent calendar. Last year, we had a fun garland with a different family activity to do everyday. This year...maybe more of the same, or maybe something fun like this fabulous find on Pinterest


I can only imagine his excitement with opening a new book every day up to Christmas. Educational and fun all wrapped with kraft paper and embellished with wrapping paper leftovers, ribbon and numbers. And it can be something super economical as well with books at the dollar store, maybe coupons to go to the local library, or even a book or two to donate to a family in need during the holidays!

November 1, 2012

DIY Bleach-Dye Scarf

I saw this tutorial for a DIY bleach-dye scarf over on Made By Andi, and thought...what the heck, why not? It might just turn into some really neat Christmas gifts.

Supply list:
Coloured scarf - make sure it's a natural fibre like linen, silk, rayon or cotton. My scarf was rayon/viscose
Bleach
Vinegar
Ribbon - I had some blue plastic raffia ribbon on hand, so that's what I used
Rubber gloves

Top l to r: all bunched up, getting bleached. Bottom l to r: vinegar soak, all done!
Edit: Before you get started, make sure that you open the windows, or better yet...do this outside or in your garage. Holy fumes, batman and those fumes can be dangerous for your breathing!!

1. Bunch and scrunch and roll your scarf, then tie it with the ribbon.

2. Place your bunched scarf/scarves in a basin. I did this project right in our laundry room, in the plastic wash tub. This made clean up a breeze!

3. Carefully pour bleach onto the scarf balls, first one side and then the other.

4. Let stand 20 minutes or so.

5. Repeat if necessary. I was happy with the first two, but not the chocolate brown one. Keep in mind that if you only pour a little bleach on your scarf ball, then only a little of it will lose its colour!

6. Pour vinegar into a seperate basin.

7. Dunk your scarf balls in, one at a time, and let stand 10 minutes.

8. Squeeze out the excess vinegar, and toss the scarves directly into the washing machine.

9. I washed my scarves on the delicate cycle for 45 minutes, and washed them twice before tossing them in the dryer.

Eggplant purple hand dyed scarf
Chocolate brown hand dyed scarf
Eggplant purple hand dyed scarf
I'm thrilled with the results, and what's even better is that they were really inexpensive to make. I picked up the scarves (two purple and one chocolate brown) at Walmart for $10 each. The bleach was $1.77 for the entire jug, and vinegar $1.98. Gloves to protect my precious hands were $3.00.

Each scarf $12.25

Have fun with bleach-dying! The impact is amazing, and I'm excited to see what people think of their custom made gifts!


See Vanessa Craft

Photobucket

October 4, 2012

Guest Blogger: Creative Cynchronicity...fall crafts!


Hi there! I'm Cyn from Creative Cynchronicity and I'm so thrilled to be guest blogging here today.  I blog about bringing the creative into the everyday whether that be crafting, cooking, parenting - just living life to its fullest!  I hope you'll drop by and have a look around.


Today, I have a really quick and easy (and inexpensive!) craft for you that adds a lovely touch to a party, a fireplace mantel, tablescape, or even as part of your front porch decor.  These little luminaries are so pretty!


The supplies you will need for this are:
Peat pots - I was able to find packages of them for $1 at Dollarama (dollar store) but you can also find them at garden centres and stores that carry plant and garden supplies
Paint - simple acrylic craft paint will work just fine here.  I chose to use silver, gold, and copper because I wanted a shimmer and for it to go with my fall decor but any colour will work.  You can find these paints at your local craft store but the ones they carry at Dollarama do a fine job as well.
A paint applicator - I used an old stiff paint brush because I wanted to do a dry brushing technique on them- again you can find these at the dollar store, an art supply store, or craft store.  You can also use a piece of a kitchen sponge if you'd like to sponge paint these or if you'd simply like to apply paint smoothly, a foam brush works well.
A large nail - I used this for poking holes in the peat pots - anything that you can poke a hole with works
Scissors - if you want to cut designs into the pots or create shaped edges
Rhinestones, beads, skeleton leaves, or other trims and doodads -  if you care to add them to your luminaries; these are completely optional!
Plain white glue - If you are using those doodads, you need a way to stick them on.  I found that a glue gun seeped through a bit so if you use that instead, use a light touch.  I also found that a white school glue worked well but because of the curved shaped of the pots, I had to spend a lot of time holding my embellishments in place while the glue began to set - otherwise they'd just fall off right away.  My preferred glue for this is Aleene's Fast Grab or Aleene's Quick Dry tacky glues because they held so much faster and there was less sitting around and waiting for glue to dry time!


I like to begin by cutting out any designs I want to have in the peat pots.  For example, I cut zigzag and scalloped edges on some and made one into a Jack O'Lantern.  I like to do the cutting first so that I can paint the edges if desired.


Next up is the painting.  I used a dry brush technique.  I found that a fairly stiff brush worked best. Dip it into your paint and then brush it several times over a paper towel or some other surface to unload as much of the paint as you can before applying it to the peat pot.  You want your brush to be nearly dry because this gives a subtle effect to the pots that can look a bit aged and weathered.  As I stated above, you could also just cover them in paint the traditional way (which is what I did with the Jack O'Lantern) or you can sponge paint on them.  Experiment and have fun with it!


Once the pots were dry (it doesn't take long!), I began gluing on any embellishments that I wanted.  Finally, if I wanted to add any holes to the pots to allow more light through, this was my last step.  I like to wait until the very end for this because then you can place them accordingly to where the embellishments and your cut out designs are.


Thanks so much to Sweet Stellas for allowing me to share this idea with you here today! I hope you enjoy it!


Photobucket
Related Posts Plugin for WordPress, Blogger...
Blogging tips