Showing posts with label Core Blogger Program. Show all posts

March 18, 2014

Upcycled Antique Toy Box #DIY #homedecor #playroom

This toy box has been in my family for as long as I can remember, and now...it seems a little dated. I wanted to be able to have somewhere that the boys will be able to put all of their toys, and use as a table top as well, but something that would be in a fun color and finish, and fit with our overall home decor.


Materials

Paint brush
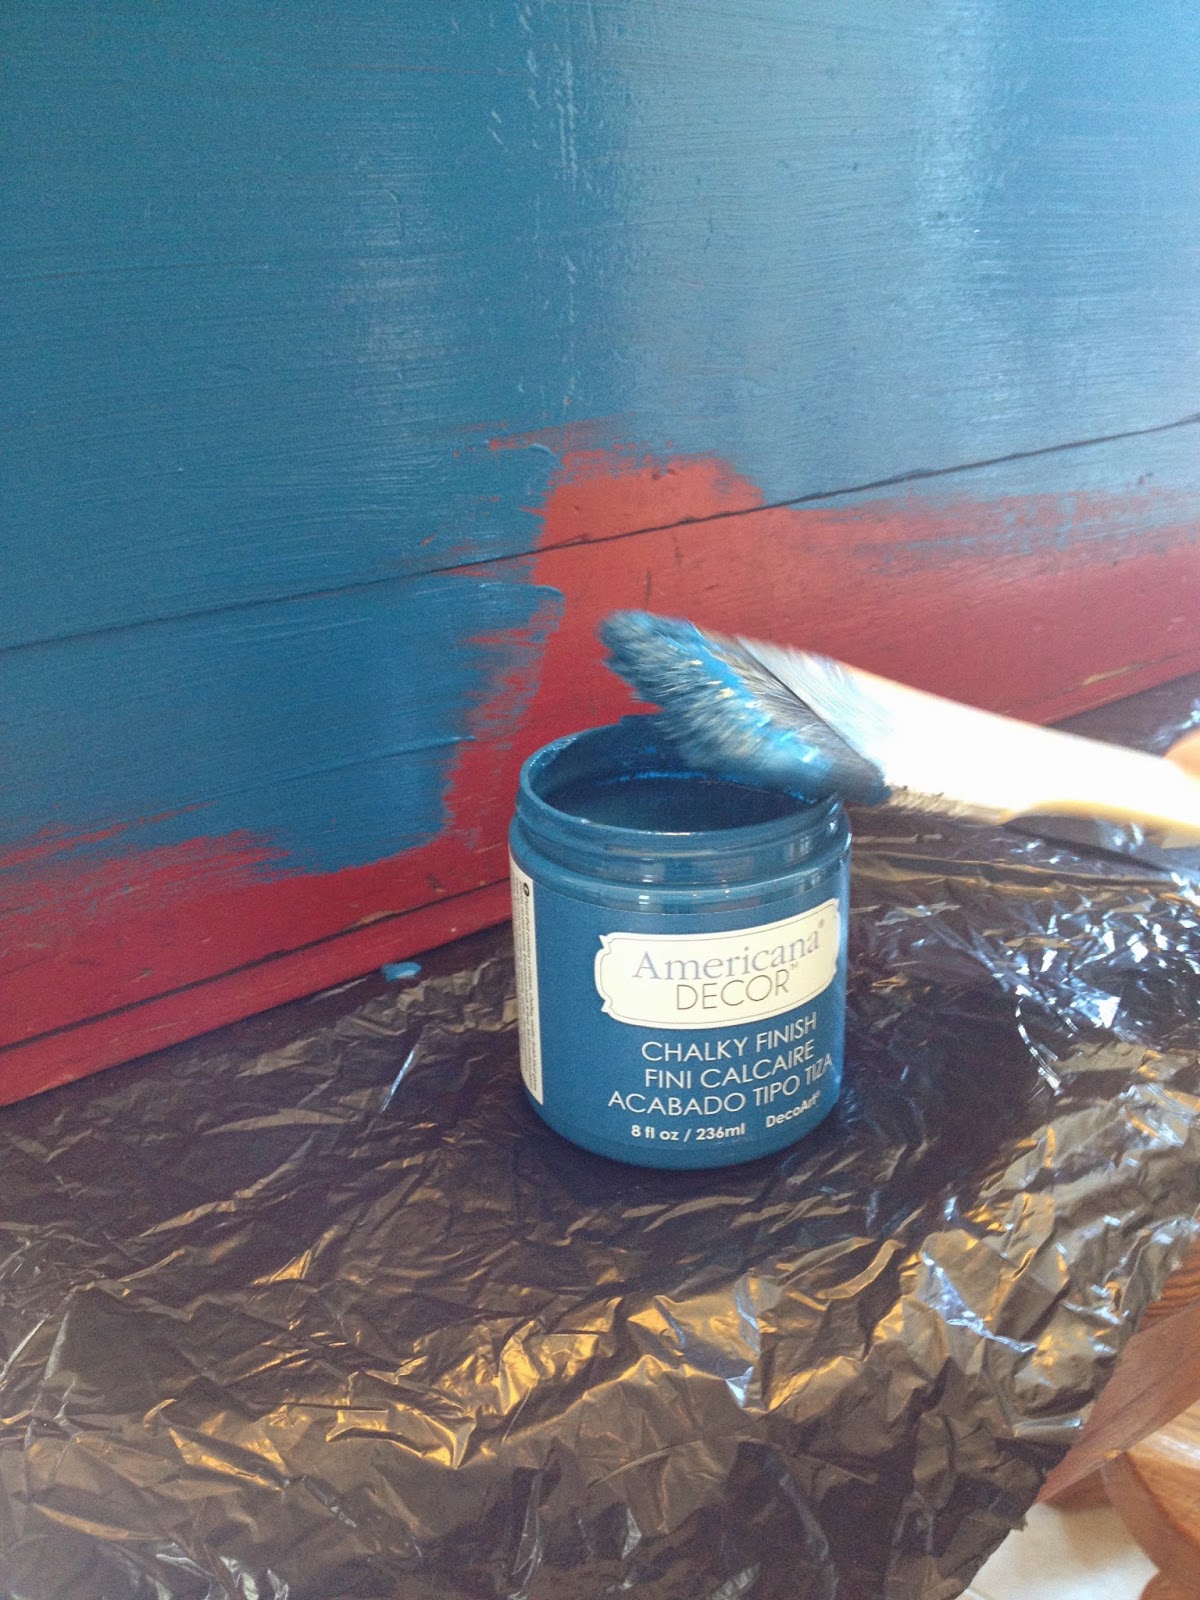
Americana Home Chalky Finish Paint (I used Legacy)
Americana Home Creme Wax Finish
Large brush
Lint free brush
Americana Chalkboard Paint
Toybox
Foam sandpaper block

First and foremost, let me tell you why I love the Chalky Finish paint. It goes on nice and smooth, and you don't need to sand your surface prior to painting. My kind of material!

Since our playroom will eventually have light grey walls, I want the accent colors to be bright and bold. Blue and red seem perfect for two little boys, so I painted just one coat of Legacy (blue). Tip: make sure you use a lint free brush or roller for the most even coverage.


While I was waiting for the Chalky Paint to dry, I applied my first coat of Chalkboard paint horizontally on the lid of the toybox. Note: I noticed that the image on the lid was still showing through after one coat, so I followed up with two more horizontal coats, then two more layers of vertical coats. 

Once completely dry, I used my foam sandpaper block to rub away some of the blue paint to let the red of the original toy box come through.


Then, finish with a the Creme Wax Finish with your large brush. Allow your first coat of wax to dry completely, then apply a second coat. As soon as the wax is dry to the touch, rub with a clean, lint free rag for a glossy finish.


Once finished with multiple coats of the Chalkboard Paint, follow these instructions to cure the surface!

Next, fill with toys and enjoy your new-to-you piece of functional furniture.


Americana Home Decor Chalky Finish Paint and Finishes are available at Home Depot.

Disclaimer: I am a part of the DecoArt Core Blogger Program, and was compensated for this post. The project concept and opinions expressed are my own.

Photobucket

February 18, 2014

DIY Parisian Inspired Journal with Americana Home Chalky Finish Paint #diy #craft

I have had a large 8.5"x11" Daler Rowney hardback sketch book in my studio for a while now...going on two years actually, and I haven't really know what to do with it until recently.

I wanted it to be something special, and I knew that the new Americana Home Chalky Finish paint and stencils would make for a really lovely design on my cover of my journal.

Materials

Sketchbook {I picked up mine at Walmart for about $12}
Americana Home Chalky Finish paint {I used Everlasting for the base and Relic for the stencil}
Americana Home Chalky Finish Stencils
Americana Traditions flat brush
Americana Accessories stencil sponge


The first step in this project is to remove the front cover from the rest of your sketchbook. Since I used a spiral bound book, it was easy to pop it off and get started painting.

With my flat brush, I applied one layer of Americana Home Chalky Finish Paint in Everlasting. When most of the cover was dry, I used the excess paint from the metal part of the paint brush handle to apply more of the paint for a distressed look.


Once dry, position your stencil {I chose Vintage Keys}. Using a stencil sponge, dip it in your accent color, then in your base color. Remove the excess paint, then apply over your stencil, working it evenly onto the surface of your sketchbook. You are essentially creating highlights and contrast, so be sure to mix it up and work with your paints until you are happy with how the stencil turns out.


Allow the paint to dry completely. You can further distress the cover of your sketchbook by rubbing the stenciled image and edges lightly with sandpaper. You can also embellish your journal with ribbons, sculpted elements, or like I have done here with a vintage skeleton key to further bring out the Parisian theme.


This project would make an excellent gift for a mom-to-be to journal her pregnancy and newborn adventures, and would also be stunning as a guest book at a wedding.

Disclaimer: I am a part of the Decoart Core Blogger program and was sent product to use for this tutorial and was compensated for this point. All views and opinion expressed are my own.
Photobucket

January 21, 2014

DIY Upcycled DecoArt Chalkboard Coffee Table


We have had this table from IKEA for a few years and it has taken a beating. It's been used as a coffee table, ottoman, race track, eating area for Owen, painting area for me and has marks, dents and scratches all over it.

It can still be a functional piece of furniture, but giving it a facelift with some Chalkboard Paint made the surface look new again.


Materials

Wooden coffee table
Clear or black Americana Chalkboard Paint

First, clean off your table from any debris, food and smudges. Make sure you clean it really well and dry it off as well. If your table top is smooth, rough it up a bit with some sandpaper so that the paint will adhere properly.

Once your surface is dry, paint a layer of Chalkboard Paint in one direction. You can choose to do this either vertically or horizontally. Allow to dry for 1 hour and then apply your second coat in the opposite direction {ie: if you painted vertically the first coat, go horizontally now, and vice versa}.


Allow to dry for 24 hours. Yes. Twenty. Four.

Now, if you quite like the color of your table, you might want to use the Clear Chalkboard Paint Coating here. This will allow the natural beauty of your table to shine through, protecting the surface, and turn it into an art centre for little ones!

Since our table had a dark espresso finish and the top was marred with various blemishes, I went with the black Chalkboard Paint.

Once the paint has cured over the 24hrs, you're ready to rub it with chalk. This is known as seasoning. Rub the surface lightly with chalk, then wipe clean. This will ensure that no phantom images get left behind on your table.

Then go crazy! Draw pictures, play tic-tac-toe...use it as a game board for when friends come over! It even makes a great homework station for the kiddos!
 

Disclaimer: I am a part of the DecoArt Core Blogger Program and was compensated for this post and project. All opinions expressed are my own.

Photobucket

December 2, 2013

Decoart Holiday Ornament Collection and Giveaway

Decoart has done it again with an amazing giveaway for the holidays! But before we get to those juicy details, a little DIY for you!

Each and every year, I either make or get new ornaments for my husband, son and myself. It's a tradition that my parents did with me, and one that I wanted to continue with my family.

This year, I was really excited to put the DecoArt Multi Surface Satin and Gloss Enamels Writers to the test.

Materials

Clear Glass Ornaments
DecoArt Multi Surface Satin (I chose Deep Scarlet to match another project I completed recently)
DecoArt 3D Gloss Enamels Writers in Opaque (I chose Gold and Silver)


First, pop the silver top off of your ornament. Next, pour some of your Multi Surface Satin into the glass ornament and swirl it around to make sure you've covered all of the ornament. Sometimes it helps to add a little bit of water to the paint to thin in out so it covers more easily. One of my ornaments is covered completely while the other one didn't turn out so well.


Flip it over and let the excess drain out, and allow to dry (mostly...it's not super important that it be 100% dry on the inside, as you're done with that surface now!)

Once your ornament is mostly dry, use your 3D Gloss Enamels Writers to draw on your designs. I went with a milkglass inspired look, so lots of staggered dots.


Allow to dry completely.

Once they're dry, you're good to hang them on your tree, put with your garlands or even in a glass bowl as a beautiful centrepiece!! Easy peasy, and oh so beautiful!


Now...for the giveaway!


a Rafflecopter giveaway


Disclaimer: I am a part of the DecoArt Core Blogger Program and was compensated for this post and project. All opinions expressed are my own.

Photobucket

November 19, 2013

Custom Running Shirts created with Ink Effects by DecoArt

Last month when I was planning my outfit for the London Lady's Half Marathon and 5k, I wanted my shirt to be refelective of where I was in my journey. Since the event was in support of Itsy, I felt it important to feature my Arrow on my shirt.

Itsy is a non-profit organization that support the NICU at London Health Science Centre. They lend a helping hand to families and babes who are faced with challenges by being in the NICU, and given that Owen had a rough start, and that we have our Arrow up in Heaven...participating in this event was really important to me.

Here's what you'll need to create your own custom long sleeved running shirt for your upcoming race.

Materials

Long sleeved shirt(s) - I got these two shirts from Walmart. G2 brand, $6 each
Ink Effects by DecoArt - I chose black since I was painting arrows, but certainly choose whatever color you like
Round paint brush
White paper - regular computer paper works well
Carboard
Iron

First, decide on your design. You can either free hand it, or use one of the awesome DecoArt stencils. Since I was wanting to do arrows, I chose to draw them free hand with Ink Effects directly on the white paper. I went with two different designs.

The three arrows represent (top to bottom) Owen, Arrow and my husband {a mix of both arrows}. This is a great design for the front or back of a shirt. Tip: If you're placing a design like this on the front of your shirt, make sure that you put it up on your chest so that it will still show after you've put your race bib on.


The single arrow is a replica of the tattoo that I got shortly after our miscarriage. It is perfect to go down a sleeve and would also look great going down the back of a shirt.


Allow your design to dry completely on the paper before moving onto the next step.

Prep your shirts by placing cardboard between the front and back, on the inside. Then, simply iron on your design, applying consistent pressure to make sure that you get even coverage of your design.


Now lace up your shoes and go for a run in your new shirt!


Tip: I found that the design transferred best when using the hottest setting on my iron.

and when all else fails, if you aren't happy with how your design transfers, go over it with a bit of Ink Effects directly on your shirt, or with So Soft.

Disclaimer: I am a part of the DecoArt Core Blogger program and was compensated for this post. The tutorial, concept, design and opinions are 100% my own.

Photobucket

October 15, 2013

Faux Glam Pumpkins using Americana Multi Surface Satin and Craft Twinkles

This year, I am really getting into decorating for Halloween and since our party is themed after the saying Something Wicked This Way Comes, I decided that we needed to get our decor chic and stylish.

Materials

Faux Pumpkins
Americana Multi Surface Satin paint in the colors of your choice (Black Ice, Dolphin, White Birch, and Cottonball are all excellent choices for this project)
Glamour Dust paints in black and white
Gloss Enamels writers in black and white
Sponges and paint brushes


There really aren't too many rules with this project and it is a great one for your little ones to engage in. Have them each create their own glam pumpkin with the Multi Surface Paint. This paint is great for projects like these as it goes on nice and thick, and unless you are painting on glass {which you can with it!} you will only need one coat.

Give your pumpkins some personality. Paint them with glittering Glamour Dust paints for an added effect, and cluster them in groupings of 3 or 5.

Next are your embellishments. Give your pumpkins a monogram with buttons or thumb tacks. Add some ribbon and bows to the stem. Go crazy, or keep it simple. I used Gloss Enamels writers to create a three dimensional faux milkglass look.


Once your pumpkins are done, let them dry overnight before giving them a new home. Ours are going up on our mantle with our chalkboard and some branches.

Happy Halloween!


Tips: For a 3-dimensional design to your pumpkins, draw on your design with hot glue before painting your pumpkin with the Multi Surface Satin or Twinkles!

Paint your stems last so that you have something to hold on to while you are painting the surface of your pumpkins!

No candlesticks lying around? Flip over a drinking glass, or piece of bar ware and set your pumpkin on top!


Disclaimer: I am a part of DecoArt Core Blogger Program and was financially compensated for this post. The concept, views and opinions expressed are my own.
Photobucket

September 2, 2013

5th Anniversary Wooden Gifts using Americana Multi Surface Satin and Stencils

When I was on the search for the perfect 5th wedding anniversary gift for my husband, it dawned on me that it was the perfect time to get crafty with my bad self.

I have seen these beautiful, yes masculine, jewelry boxes at local home decor stores and thought to myself I can totally make that. So...here goes!

Materials

Wooden box in the shape and size of your choice {I went with a standard round box}
Paint brushes
Americana Multi Surface Satin in the colors of your choice {I chose Dolphin and Mushroom}
Cup for water
Sponge wedge
Paper towel
Americana geometric stencils {oh hey...I designed the geometric one that is NEW for 2013!}
Fine sandpaper {optional}


First, wipe down your wooden box to clear any dust from being up on the shelf at the store. Next, water down a bit of your lighter Americana Multi Surface Satin color. Paint it on the wooden box, rubbing off the excess paint with paper towel.

Essentially, you are using the paint as a custom wood stain. Cool, right? The more you rub with a paper towel, the more of a distressed look you will have in the end.

Where can you find these awesome new paints from DecoArt? Americana Multi-Surface Satins are available for purchase at Michaels, A.C. Moore, Hobby Lobby, and other fine craft retailers.

Once you have allowed the box to dry entirely, you are ready to get stenciling. Carefully place your stencil over the area on your box that you want to embellish, and with your sponge wedge, paint your second color {the darker tone} over the stencil. Use a dabbing motion and add the paint on very lightly. You may want to remove some of the excess paint

Peel away the stencil, and clean it off while you wait for the paint to dry a bit. Once the paint is completely dry, you can go in with your fine sandpaper and distress to your hearts content. You can choose to do only the edges, or go over the entire surface. Alternatively, if you'd prefer not to use sandpaper, you can wait until your paint is almost dry and distress with a dry paint brush, wire brush, or steel wool.

I absolutely love the worn look of this box and think that my husband will love it as well!


Now you can SAVE on the Americana Multi Surface Satin (US Residents only)


Disclaimer: I am a part of DecoArt Core Blogger Program and was financially compensated for this post. The concept, views and opinions expressed are my own.

Photobucket

August 14, 2013

DIY Upcycled Bottle Vases using DecoArt Transparent Gloss Enamels and Glass Stain

We all have bottles in our recycling bin, and did you know that you can easily create vases out of them, perfect for giving a little bouquet of flowers to a friend, using some of the awesome glass paints and stains from DecoArt?

Materials:
three bottles - these really can be anything. I chose clear cooler bottles that were in the recycling bin
Glass Stains - Pink, Yellow, Iridescent Orange
Transparent Gloss Enamels - Turquoise, Red, Crystal
sponges
plastic palette knives

First, make sure that your bottles are clean and all of the labels have been removed. My bottles had a bit of the label residue left on them, and turned out just fine.

Using your Glass Stains, drip the paint onto your bottles. I chose to stain each of the bottles before applying the Transparent Gloss Enamels to give them more depth to the design. DecoArt has really amazing tools that you can use for application of the glass paints, and the sponges were perfect to ensure that I had an even coat of Glass Stain on my bottles.

To create an accent bottle, I simply apply all three of your chosen Glass Stain colors in a drip pattern from the mouth of the bottle so that it runs down the sides, similarly to candle wax down the side of a taper candle. When all three bottles are clustered together, they will coordinate without being matchy-match.

Here's the hard part. To ensure the best coverage and let the product be its amazing self, you need to wait 24hours between applications. Once dry, go in with a Transparent Gloss Enamel to accent the Glass Stain. I chose to use the transparent tones on just the neck and mouth of the bottle; red with yellow, and crystal with orange.

For my accent bottle, I used the DecoArt glass palette knives to add dimension and an abstract flair to the bottle.


Want to try the glass paints? Here's a rebate {good only for US residents}

Pop over to my Facebook page to see the finished project!

Americana Glass Paints are available at Michaels, JoAnn Fabric and Craft Stores, Pat Catan's Craft Centers, A.C. Moore, Beverly's, and other fine craft retailers. For more information on Americana Glass Paints visit http://www.decoart.com/glasspaint.

Disclaimer: I am a writer for the DecoArt Core Blogger Program and I was compensated for this post. 


Photobucket

August 12, 2013

Black and White Trendy Wine Carafe DIY on DecoArt

What's black and white, and carries wine? A beautiful wine carafe DIY over on DecoArt that I've created for summer entertaining!


It's the perfect project for those that have glassware that needs an update, and those who want to keep their homes trendy and fresh.

Head on over to DecoArt's beautiful new blog to get the instructions on how to create your own Black and White wine Carafe!

Photobucket
Related Posts Plugin for WordPress, Blogger...
Blogging tips